I recently had a requirement to configure Logic Apps for use with the Azure On-Premise Data Gateway and connection to an Oracle On-Premise database. Since I did not have access to the Oracle database at that point, I decided to try this out with an On-Premise SQL Server database as the logic should have been similar. I downloaded the Azure On-Premise Data Gateway and installed it on the server, and the configured the Azure environment to connect to the server and post data back to Dynamics 365. This post will be split into 2. The first is the installation of the Azure On-Premise Data Gateway, and the second is the configuration in Microsoft Azure, creating the connection, Logic App and setting the trigger and action.
The first thing that needs to be implement is installing the Azure On-Premise Data Gateway. We can download the Gateway from the Microsoft web site, by following the following link: http://aka.ms/azureasgateway. Once the Gateway is downloaded, it should be installed on a server that is always running (such as a Windows Server machine). Double click on the GatewayInstall.exe file in order to start the installation process. The Microsoft .NET Framework 4.6 is a prerequisite for the installation. If it is not installed on the machine, the software will be downloaded and installed (a reboot might be required on the machine if you have to install the .NET Framework).
The image below shows the startup screen of the On-Premises Data Gateway. In this page, specify the location to install the gateway to, and accept the Terms of Use and Privacy Statement.
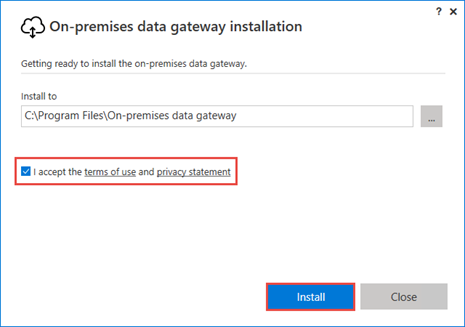
Upon clicking install, the software will be installed on the designated computer. On the next screen, we need to provide an identity account that will be used with the Gateway. This should be an Active Directory/Office 365 account that has a subscription to Microsoft Azure. If possible, this account should also have access to Dynamics 365 (even as a service account). Enter your Office 365 account, and click on the Sign in button:
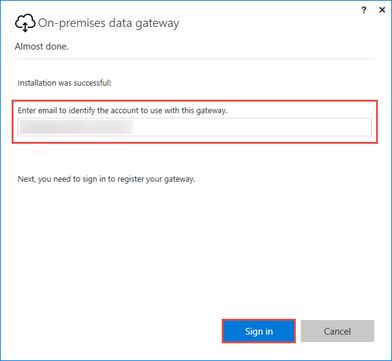
The Office 365 Sign in window will pop up, requesting the password to use. If you a running on a server with Protected Mode enabled, or in a security that will not allow you to sign in to Office 365, you might have to add the Office Login pages to your trusted sites in order to allow this connection. After you have signed in to Azure, the Gateway will have to be registered. You will also have the option to Migrate, restore or takeover an existing gateway, but in our case we will be registering a new gateway (as shown below):
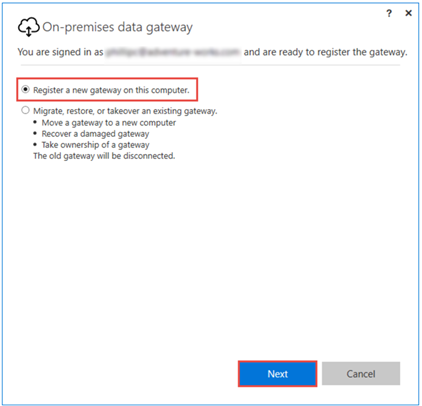
Click Next on the Register a New Gateway page. This will navigate to the next page of the data gateway configuration wizard, where you will have to provide a name for the Gateway, and a recovery key. The recovery key is used to restored the gateway if necessary in the future, and cannot be changed. A default region will be selected based on your Azure settings, but it can be changed from this location if desired. The screenshot below shows the Final configuration screen:
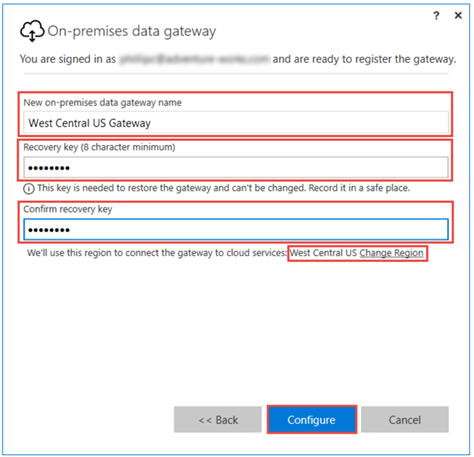
Once you click on Configure, the On-Premise data gateway will establish connections and start operation. The rest of the configuration happens outside of this server machine.
If you firewall is preventing you from finalizing this configuration, see the ports that have to be opened in order to allow this operation:
https://docs.microsoft.com/en-us/azure/logic-apps/logic-apps-gateway-install#configure-a-firewall-or-proxy
For the purpose of this article, we will be using SQL Server. We have created a sample database called Registration with a table called Users, containing a list of users that can be added to the database. The UserId is an integer identity fields which is required by Azure to track the creation of new records. The image below showns the database that has been created for this purpose.

In the next post, we will review the configuration inside of our Azure Portal.

