
In a recent project a needed to create a PCF control, to display a notification within the form. The MessageBar Fluent UI v9 component provided the functionality that we were looking for, so we decided to go ahead and take advantage of that.
The PCF Builder extension for Visual Studio code (by Danish Naglekar) provides some easy to use commands to create and initialize that newly created PCF Component. Let’s go ahead and start this step by step process.
Create your VSCode project
In VSCode, start by opening the folder where you are going to place your files. In our example we will use the C:\Repos\MessageBar folder, but this can be any other folder.
Press CTRL+SHIFT+P on your keyboard, and then in the search bar type PCF. This will bring up a list of PCF Builder commands that you can use.

Select the PCF Builder: Initialize Component (Simple) option and answer the following questions:
- Namespace for your Control: PCFControls.Virtual
- Control Name: MessageBar
- Pick template for your project (field or dataset): field
- Pick additional libraries to install (None, React, React + Fluent UI): React + Fluent UI
The pac pcf init and the npm install commands will execute. Once done we can start working on the component.
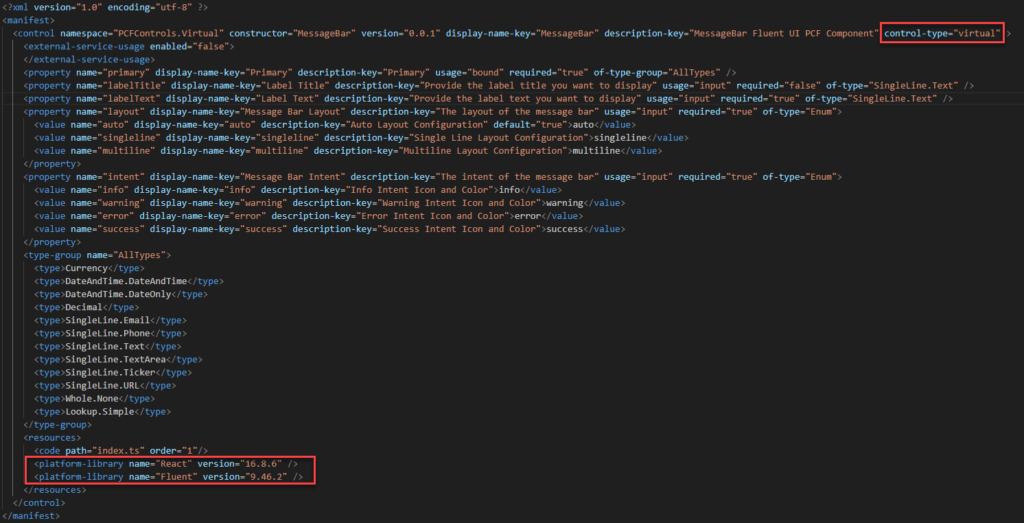
Open the ControlManifest.input.xml file and change the control type from standard to virtual as well as adding the resources for virtual controls for v9 and any required properties for the control. The image below shows the changes:
Create a folder called components under the MessageBar folder and within that folder create a file called FluentMessageBar.tsx. Add the following code to the FluentMessageBar file (as shown in the image below)

Modify the index.ts file to include the definitions, properties and update the init and updateView functions as needed
import * as React from "react";
import FluentMessageBar, { FluentMessageBarProps } from "./components/FluentMessageBar";
import { IInputs, IOutputs } from "./generated/ManifestTypes";

export class MessageBar implements ComponentFramework.ReactControl<IInputs, IOutputs> {
    private theContainer: HTMLDivElement;

    private props: FluentMessageBarProps = {
        labelTitle: "Hello World",
        labelText: "Hello World",
        layout: "multiline",
        intent: "info"
    };

    public init(context: ComponentFramework.Context<IInputs>, notifyOutputChanged: () => void, state: ComponentFramework.Dictionary, container:HTMLDivElement): void
    {
        // Add control initialization code
        this.theContainer = container;
    }

   public updateView(context: ComponentFramework.Context<IInputs>): React.ReactElement
    {
        // Add code to update control view
        if (context.parameters.labelTitle.raw)
        {
            this.props.labelTitle = context.parameters.labelTitle.raw;
        }

        if (context.parameters.labelText.raw)
        {
            this.props.labelText = context.parameters.labelText.raw;
        }

        if (context.parameters.layout.raw)
        {
            this.props.layout = context.parameters.layout.raw;
        }

        if (context.parameters.intent.raw)
        {
                this.props.intent = context.parameters.intent.raw;
        }

        return React.createElement(FluentMessageBar, this.props);
    }
Once the code for the component has been built, we are ready to build and test the component. The first thing we need to do is build and test the components. This can be done by calling the following commands:
- npm run build
- npm start watch
The npm run build will build and validate the code to make sure that the application executes successfully, while the npm start watch will allow you to test the component. You can make changes to your code while in watch mode and see them get updated in the watch window. Once done, press CTRL+C in the terminal window to exit the test harness.
Next, we will need to create a subfolder for the project file. We will do this by running the following commands from the terminal window. These commands can be updated to your specifications
- md MessageBarControl
- pac solution add-reference –path ‘C:\Repos\MessageBar’
Once all of these commands are run, in the terminal window type dotnet build. This replaces the msbuild commands from within Visual Studio Developer Command prompt.
Next we will need to publish this solution to our Dataverse environment. First, navigate back to your root directory C:\Repos\MessageBar from the control directory by typing cd.. in the terminal window. Then call the following pac auth commands to create the authorization profile and deploy the solution:
- pac auth create — url https://xyz.crm#.dynamics.com
- pac pcf push –publisher-prefix pcf
In the auth create replace the url with your organization url. Note that this will be deprecated in the near future and replaced with organization.
The source code for the solution is available on my github repo.